记录一下学习vue的过程。
vue核心
数据驱动
传统jquery:
1
2
3
4
5
6
7
| <div>
<span class="txt"></span>
</div>
<script>
$('.txt').text('填充span的内容');
</script>
|
vue数据驱动:一旦改变data里txt变量的内容,则span里面绑定的txt也会跟着改变。
注意:data属性的值不可以被页面修改。
注意:在组件里面使用变量需要这样写:
1
2
3
4
5
6
7
8
9
| <script>
export default {
data: function() {
return {
msg: '填充span的内容'
}
}
}
</script>
|
组件里面不能直接这样写,页面里面可以直接这样写:
1
2
3
4
5
6
7
| <script>
export default {
data: {
msg: '填充span的内容'
}
}
</script>
|
下面是vue的写法:
1
2
3
4
5
6
7
8
9
10
11
12
13
14
15
| <template>
<div>
<span>{{ txt }}</span>
</div>
</template>
<script>
    export default {
        data: function() {
            return {
                msg: '填充span的内容'
            }
        }
    }
</script>
|
现在用js的 setTimeout() 来改变span里面txt的内容,这样span里面的txt就会在组件加载完毕后的1000ms后改变msg的值。
1
2
3
4
5
6
7
8
9
10
11
12
13
14
15
16
17
18
19
20
21
| <template>
<div>
<span>{{ msg }}</span>
</div>
</template>
<script>
export default {
data: function() {
return {
msg: '填充span的内容'
}
},
mounted: function() {
var self = this;
setTimeout(function() {
self.msg = '改变了的数据'
}, 1000)
}
}
</script>
|
props属性,可以暴露出去让页面异化组件的文案。
指令
一般形式 v-xxx
v-text="msg" 和
v-html 用于更新元素的 innerHTML
V-if :根据表达式真假 渲染元素。
v-show :根据表达式真假切换元素的display。
组件
如何在父组件里面引入子组件?
编辑父组件:
1
2
3
4
5
6
7
8
9
10
11
12
13
14
15
16
17
18
| <template>
<div id="parent">
<son></son>
</div>
</template>
<script>
import son from '@/components/son'
export default {
name: 'parent',
components: {
son
}
}
</script>
|
方法
vue中定义方法:
1
2
3
4
5
6
7
8
9
| <script>
export default {
methods: {
doSth: function() {
alert('done');
}
}
}
</script>
|
使用方法:
v-on:eventName 用于绑定事件,这里绑定click事件
1
2
3
4
5
6
7
8
9
10
11
12
13
| <button v-on:click="doSth">{{ txt }}</button>
//缩写为
<button @click="doSth">{{ txt }}</button>
<script>
export default {
methods: {
doSth: function() {
alert(txt);
}
}
}
</script>
|
生命周期
beforeCreate:组件创建之前
created:组件创建完毕
beforeMount:组件挂载之前
mounted:组件挂载完毕
beforeDestory:组件销毁之前
destroyed:组件销毁后
vue中还有一些认为出发的回调函数:
deactivated:组件未使用状态
activated:组件使用状态(只有在被keep-alive标签包含的时候才会activated和deactivated)
beforeUpdate:组件变动之前
updated:组件变动之后(全局监听)
watch
可以监听data里面的数据。
watch的用法:
1
2
3
4
5
6
7
8
9
10
11
12
13
| <script>
export default {
watch: {
'info.name': function(newV, oldV) {
console.log(newV);
console.log(oldV);
},
sex: function(newV, oldV) {
console.log(newV);
}
}
}
</script>
|
vue里面不能直接监听一个对象,只能监听对象的值或者变量。
下面的例子:watch监听 info.name ,一旦发生改变就执行后面的函数。
1
2
3
4
5
6
7
8
9
10
| <script>
export default {
watch: {
'info.name': function(newV, oldV) {
console.log(newV);
console.log(oldV);
}
}
}
</script>
|
上面的函数在 info.name 发生改变后就执行,紧接着 updated() 才执行。
如何监听一个对象,下面是监听一个info对象的写法:
1
2
3
4
5
6
7
8
9
10
| <script>
export default {
watch: {
info: {
handler: function(n, o) {},
deep: true
}
}
}
</script>
|
computed
v-model
lazy懒加载
v-model.lazy="modelValue"
trim去掉空白
v-model可以做到双向绑定,下面是例子:
1
2
3
4
5
6
7
8
9
10
11
12
| <div id="demo">
<input v-model="msg">
<p>{{msg}}</p>
</div>
<script>
export default {
data: {
msg: '信息'
}
}
</script>
|
安装
- 方法一:在html中以script标签引入
1
| <script src="https://lib.baomitu.com/vue/2.6.10/vue.js"></script>
|
- vue-cli方式引入(通常用这种方式引入)
安装cnpm
1
| $ npm install -g cnpm --registry=https://registry.npm.taobao.org
|
安装vue-cli
1
| $ cnpm install -g vue-cli
|
初始化
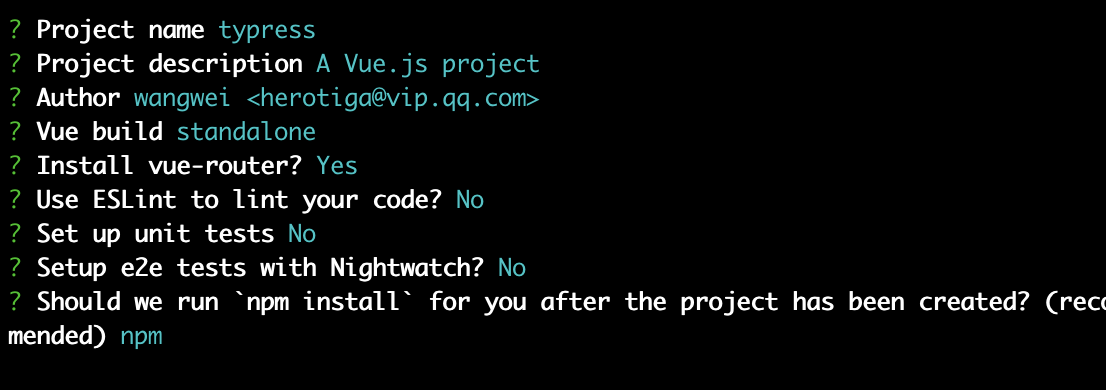
初始化vue项目
webpack参数表示用webpack打包,它可以把.vue打包成css html js文件。
1
| $ vue init webpack project_name
|
选项配置如下:
等待安装完毕:
1
2
3
| $ cd test
$ cnpm install
$ npm run dev
|
开发
开发过程中发现vue的视图有 padding: 8px 的样式。下面清除vue的默认样式。
清除vue默认样式
App.vue文件style标签中添加
1
2
3
4
| body {
padding: 0;
margin: 0;
}
|
或者在main.js文件中引入一个reset.css文件:
1
| import '@/css/reset.css'
|
reset.css:
1
2
3
4
5
6
7
8
9
10
11
12
13
14
15
16
17
18
19
20
21
22
23
24
25
26
27
28
29
30
31
32
33
34
35
36
37
38
39
40
41
42
43
44
45
46
47
48
49
50
51
52
53
54
55
56
57
58
59
60
61
62
63
64
65
66
67
68
69
70
71
72
73
74
75
76
77
78
79
80
81
82
83
84
85
86
87
88
89
90
91
92
93
94
95
96
97
98
99
100
101
102
103
104
105
106
107
108
109
110
111
112
113
114
115
116
117
118
119
120
121
122
123
124
125
126
127
128
129
130
131
132
133
134
135
136
137
138
139
140
141
142
143
144
145
146
147
148
149
150
151
152
153
154
155
156
157
158
159
160
161
162
163
164
165
| html,
body,
div,
span,
applet,
object,
iframe,
h1,
h2,
h3,
h4,
h5,
h6,
p,
blockquote,
pre,
a,
abbr,
acronym,
address,
big,
cite,
code,
del,
dfn,
em,
img,
ins,
kbd,
q,
s,
samp,
small,
strike,
strong,
sub,
sup,
tt,
var,
b,
u,
i,
center,
dl,
dt,
dd,
ol,
ul,
li,
fieldset,
form,
label,
legend,
table,
caption,
tbody,
tfoot,
thead,
tr,
th,
td,
article,
aside,
canvas,
details,
embed,
figure,
figcaption,
footer,
header,
menu,
nav,
output,
ruby,
section,
summary,
time,
mark,
audio,
video,
input {
margin: 0;
padding: 0;
border: 0;
font-weight: normal;
vertical-align: baseline;
}
article,
aside,
details,
figcaption,
figure,
footer,
header,
menu,
nav,
section {
display: block;
}
body {
line-height: 1;
font-family: "Microsoft YaHei";
font-size: 16px;
}
blockquote,
q {
quotes: none;
}
blockquote:before,
blockquote:after,
q:before,
q:after {
content: none;
}
table {
border-collapse: collapse;
border-spacing: 0;
}
a {
color: #7e8c8d;
text-decoration: none;
-webkit-backface-visibility: hidden;
}
li {
list-style: none;
}
::-webkit-scrollbar {
width: 5px;
height: 5px;
}
::-webkit-scrollbar-track-piece {
background-color: rgba(0, 0, 0, 0.2);
-webkit-border-radius: 6px;
}
::-webkit-scrollbar-thumb:vertical {
height: 5px;
background-color: rgba(125, 125, 125, 0.7);
-webkit-border-radius: 6px;
}
::-webkit-scrollbar-thumb:horizontal {
width: 5px;
background-color: rgba(125, 125, 125, 0.7);
-webkit-border-radius: 6px;
}
html,
body {
width: 100%;
}
body {
-webkit-text-size-adjust: none;
-webkit-tap-highlight-color: rgba(0, 0, 0, 0);
}
|
以上reset.css代码经过了压缩,用的时候在项目目录 @/css 下新建一个reset.css文件,将上面代码复制进去,再再main.js中import即可。
编译
最终代码在 dist 目录中
目录
init 完毕后项目目录下有这些文件:
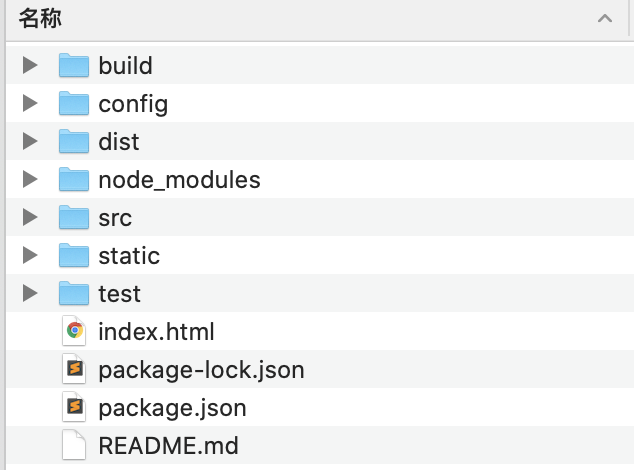
Package.json 保存依赖信息
config 保存项目初始化配置
build 保存webpack初始化配置
需要写的代码都在 src 中
src/main.js 是入口js文件
dist 是最终编译生成的代码
main.js文件
1
2
3
4
5
6
7
8
9
10
11
12
13
14
15
16
17
18
19
20
21
22
23
24
25
26
27
28
29
|
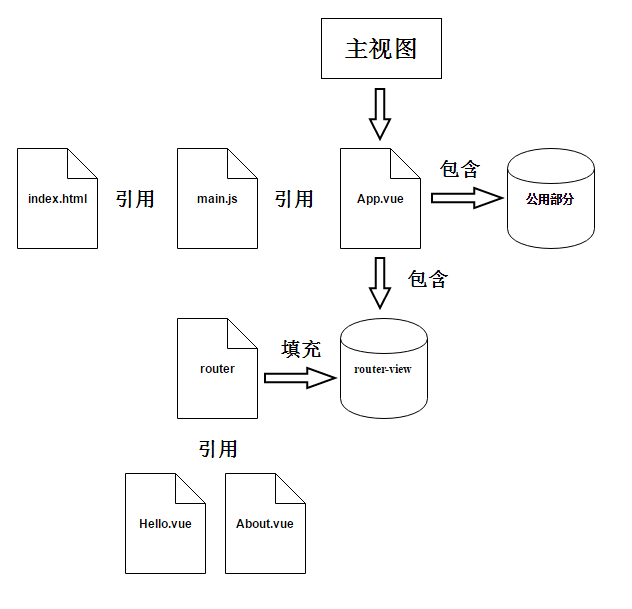
import Vue from 'vue'
import App from './App'
import router from './router'
Vue.config.productionTip = false
new Vue({
el: '#app',
router,
components: {
App
},
template: '<App/>'
})
|
App.vue文件
在vue中这种文件叫做 组件 ,单页面的意思是结构、样式、逻辑都写在一个 .vue 文件中,当我们引入这个文件后就相当于引入了对应的结构、样式和js,这就是前端组件化。
1
2
3
4
5
6
7
8
9
10
11
12
13
14
15
16
17
18
19
20
21
22
23
| <template>
<div id="app">
<img src="./assets/logo.png">
<router-view />
</div>
</template>
<script>
export default {
name: 'App'
}
</script>
<style>
#app {
font-family: 'Avenir', Helvetica, Arial, sans-serif;
-webkit-font-smoothing: antialiased;
-moz-osx-font-smoothing: grayscale;
text-align: center;
color: #2c3e50;
margin-top: 60px;
}
</style>
|
对于 .vue 文件,webpack在编译的时候将 .vue 文件中的html、css、js分别抽离出来组成一个单独的文件。
.vue 组件文件组成: <template> 标签, <script> 标签以及 <style> 标签。这里注意在 .vue 文件的最后面总是要留一个空行。
<template> 标签下仅能有一个根标签,
vue依靠锚点达到不需要刷新页面就切换内容的效果。
<router-view> 标签的作用是在页面中放入一个路由器视图容器,当我们访问 http://localhost:8080/#/about/ 的时候会将about的内容放进去,访问 http://localhost:8080/#/recruit 的时候会将recruit的内容放进去
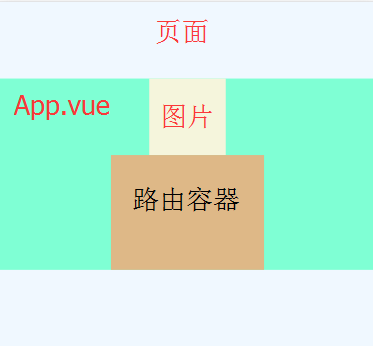
也就是说除了 <router-view> 中的视图, App.vue 文件中的其他部分都是公用的,无所访问什么路由都会有这部分。
路由文件router/index.js
1
2
3
4
5
6
7
8
9
10
11
12
13
14
15
16
17
| import Vue from 'vue'
import Router from 'vue-router'
import HelloWorld from '@/components/HelloWorld'
Vue.use(Router)
export default new Router({
routes: [{
path: '/',
name: 'HelloWorld',
component: HelloWorld
}]
})
|
比如配置 http://localhost:8080/#/about/me ,其实只需要给/about加一个子路由既可。
1
2
3
4
5
6
7
8
9
10
11
12
13
14
15
16
17
18
19
20
| export default new Router({
routes: [{
path: '/',
name: 'HelloWorld',
component: HelloWorld
},
{
path: '/about',
name: 'about',
component: About,
children: [{
path: '/',
component: page1
}, {
path: '/me',
component: Me
}]
}
]
})
|
然后在 about.vue 中放路由既可
1
2
3
4
| <template>
<div>共用部分</div>
<router-view></router-view>
</template>
|
页面一般放在 pages 或者 views 目录下,组件放在 components 目录下,但其实页面和组件都是组件。
如果我想让用户访问我配置之外的路由的时候跳转到根目录该怎么办?使用 path: /*
1
2
3
4
5
6
7
8
9
10
11
12
13
14
15
16
17
18
19
20
21
22
23
24
25
| export default new Router({
routes: [{
path: '/',
name: 'HelloWorld',
component: HelloWorld
},
{
path: '/about',
name: 'about',
component: About,
children: [{
path: '/',
component: page1
}, {
path: '/me',
component: Me
}]
},
{
path: '/*',
name: 'HelloWorld',
component: HelloWorld
}
]
})
|
<router-link> 标签是vue提供的用于路由跳转的:
1
2
3
4
5
| <template>
<div id="app">
<router-link :to="{name: HelloWorld}">前往helloworld</router-link>
</div>
</template>
|
也可以使用传统a标签写:
1
| <a href="#/">前往helloworld</a>
|
小节
.vue 文件中有共用部分也有根据路径选择性装载的部分。这部分的vue文件写完后再在 router/index.js 中配置好了路由,然后在公共部分后面加上 <router-view></router-view> 既可。
组件
将经常用的代码比如按钮、导航等等封装成组件以方便后续使用。调用只需要写 <组件名></组件名> 。
一个页面可以由很多组件组成。
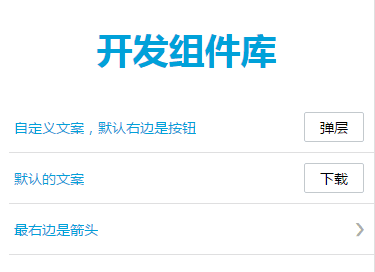
开发组件库
我们在日常开发中将一个按钮、导航、列表等元素封装成组件以后以后使用。调用只需要写上 <component-name></component-name> 即可。
现在要开发一个页面:
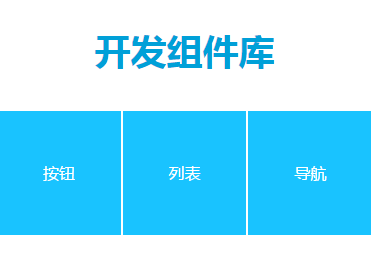
一个首页,包含三个字页面:按钮页面,列表页面,导航页面。
页面都放在 @/pages 中,组件都放在 @/components 中。
@/pages 中包含首页和三个子页面, @/components 中包含三个组件。
先进行路由配置:先import页面组件,再配置路由。
1
2
3
4
5
6
7
8
9
10
11
12
13
14
15
16
17
18
19
20
21
22
23
24
25
26
27
28
29
30
31
32
33
34
| import Vue from 'vue'
import Router from 'vue-router'
import index from '@/pages/index.vue'
import pageQuiButton from '@/pages/pageQuiButton.vue'
import pageQuiList from '@/pages/pageQuiList.vue'
import pageQuiNav from '@/pages/pageQuiNav.vue'
Vue.use(Router)
export default new Router({
routes: [{
path: '/',
name: 'index',
component: index
},
{
path: '/btn',
name: 'btn',
component: pageQuiButton
},
{
path: '/list',
name: 'list',
component: pageQuiList
},
{
path: '/nav',
name: 'nav',
component: pageQuiNav
}
]
})
|
以上路由配置的意思是:
首页: http://localhost:8080/#/
按钮页面: http://localhost:8080/#/btn
列表页面: http://localhost:8080/#/list
导航页面: http://localhost:8080/#/nav
注意根页面是: #/ ,比如:
1
2
3
| <template>
<a href="#/">链接</a>
</template>
|
再来看 App.vue 里面
1
2
3
4
5
6
| <template>
<div id="app">
<h1 class="page-title"><a href="#/">开发组件库</a></h1>
<router-view></router-view>
</div>
</template>
|
上面的h1是一个公共元素,无论进入页面都有它。
tips:除了直接在 style 标签里写样式之外,还可以引入css文件,只要在 <style> 中添加 @import 'url'; ,比如:
1
2
3
| <style scoped>
@import '@/assets/css/common.css';
</style>
|
scoped 关键字代表样式是私有的。
下面写首页 index.vue :这里用 @import 引入样式
1
2
3
4
5
6
7
8
9
10
11
12
13
14
15
16
17
18
19
20
21
22
23
24
| <template>
<div class="mod-module mod-parallel">
<div class="img-list type-full">
<div class="img-box">
<p class="img-item">
<a class="page-link" href="#/btn">按钮</a>
</p>
</div>
<div class="img-box">
<p class="img-item">
<a class="page-link" href="#/list">列表</a>
</p>
</div>
<div class="img-box">
<p class="img-item">
<a class="page-link" href="#/nav">导航</a>
</p>
</div>
</div>
</div>
</template>
<style scoped>
@import '@/assets/css/index.css'
</style>
|
<template> 中的内容和平时写html差不多,不过 <template> 标签下只能有一个根元素。
特别注意下a标签 href 属性的书写:
1
| <a class="page-link" href="#/btn">按钮</a>
|
vue运行时将 <template> 中的内容都注入到App.vue页面的 router-view 中,从而可以实现无刷新路由跳转。
下面编写按钮组件quiButton.vue
1
2
3
4
5
6
7
8
9
10
11
12
13
14
15
16
17
18
19
20
| <template>
<button class="qui-btn">
<span>{{ msg }}</span>
</button>
</template>
<script>
export default {
data: function() {
return {
msg: '下载'
}
}
}
</script>
<style scoped>
@import '@/assets/css/reset.css';
@import '@/assets/css/qui-btn.css'
</style>
|
如果这不是组件的话,正常data的写法可以直接写一个对象 data: { msg: '下载' } , 但是由于组件会被在多个地方引用,故而这里用function来每次返回一个对象实例。
如果我希望每次调用按钮组件按钮里面的内容都不相同(如下),该怎么办。
1
| <qui-btn msg="确定" class="small"></qui-btn>
|
只需要将属性写在props里面。
1
2
3
4
5
6
7
8
9
| <script>
export default {
props: {
msg: {
default: '下载'
}
}
}
</script>
|
把属性写在props里面就可以暴露给其他页面调用。props是专门用来暴露组件的属性接口的。这里定义了msg的默认值 下载 ,其他页面调用只需要:
1
| <qui-btn msg="确定"></qui-btn>
|
vue如何绑定事件?使用methods属性:
1
2
3
4
5
6
7
8
9
10
11
12
13
14
15
16
17
18
19
20
| <template>
<button class="qui-btn" v-on:click="btnClickEvent">
<span>{{msg}}</span>
</button>
</template>
<script>
export default {
props: {
msg: {
default: '下载'
}
},
methods: {
btnClickEvent: function() {
alert(this.msg);
}
}
}
</script>
|
写完事件函数后,给按钮绑定事件:
1
2
| <button v-on:click="btnClickEvent">
</button>
|
或者:
1
2
| <button @click="btnClickEvent">
</button>
|
现在我们已经做好了按钮组件了,来使用pageQuiButton.vue组件。
1
2
3
4
5
6
7
8
9
10
11
12
13
14
15
16
| //pageQuiButton.vue
<template>
<div id="pageQuiButton">
<qui-btn msg="确定" class="small"></qui-btn>
</div>
</template>
<script>
import quiBtn from '../components/quiButton.vue'
export default {
name: 'pageQuiButton',
components: {
'qui-btn': quiBtn
}
}
</script>
|
首先,script里面import了按钮组件复制给变量quiBtn,在components中给他自定义标签名,用msg给组件传值。
那么按钮的点击事件怎样异化呢:
1
| <qui-btn v-on:btnClickEvent="doSth" msg="我可以点击"></qui-btn>
|
上面的代码引用组件时注册了一个时间,btnClickEvent事件时组按钮组件中定义的,这里给这个btnClickEvent一个新的方法doSth。
同时,在script中声明这个自定义方法:
1
2
3
4
5
6
7
8
9
10
11
12
13
14
15
| //pageQuiButton.vue
<script>
import quiBtn from '@/components/quiButton.vue'
export default {
name: 'pageQuiButton',
components: {
'qui-btn': quiBtn
},
methods: {
doSth: function() {
alert('你点击了组件的click:btnClickEvent');
}
}
}
</script>
|
以上的方法叫做监听,组件引用房监听子组件的内置方法,同时在子组件中需要出发这个事件,一下时在子组件中的关键代码:
1
2
3
4
5
6
7
8
9
10
11
12
13
14
15
16
17
| //quiButton.vue
//子组件中的代码
<script>
export default {
props: {
msg: {
default: "下载"
}
},
methods: {
btnClickEvent: function() {
alert("先弹出默认的文案");
this.$emit("btnClickEvent");
}
}
};
</script>
|
父组件监听,子组件触发。
这样引用方(父组件)就可以给不同子组件调用不同的事件处理了。
1
2
3
4
5
6
7
8
9
10
11
12
| <qui-btn v-on:btnClickEvent="doSth1" msg="确定"></qui-btn>
<qui-btn v-on:btnClickEvent="doSth2" msg="取消"></qui-btn>
<script>
methods: {
doSth1: function() {
alert('111');
},
doSth2: function() {
alert('222');
}
}
</script>
|
怎样给按钮加上图片:slot插槽
给按钮组件加上一段结构
1
2
3
4
5
6
7
8
| //quiButton.vue
<template>
<button class="qui-btn" v-on:click="btnClickEvent">
<slot name="icon"></slot>
<span>{{msg}}</span>
</button>
</template>
|
引用:
1
2
3
| <qui-btn msg="下载" class="with-icon">
<img slot="icon" class="ico" src="xxx.png" />
</qui-btn>
|
渲染的时候,会将img整个替换掉组件中的对应name的slot标签。
quiNav.vue组件
如下:
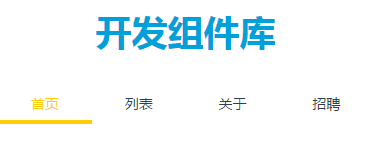
功能需求:点击导航tab可以给当前 tab加上一个active类,同时切换底部的黄色滑条,并且输出当前tab文案,同时支持自定义事件。
还得暴露一个属性支持导航tab个数。
关键代码:
1
2
3
4
5
6
7
8
9
10
11
12
13
14
15
16
17
18
19
20
21
22
23
24
25
26
27
28
29
30
31
32
33
34
35
| //quiNav.vue
<template>
<div class="qui-nav nav-type-1">
<a v-for="(item, index) in items">
<span class="nav-txt">{{item.text}}</span>
</a>
</div>
</template>
<script>
export default {
data: function() {
return {
items: [{
text: '首页',
active: true
},
{
text: '列表',
active: false;
},
{
text: '关于',
active: false
},
{
text: '招聘',
active: false
}
]
}
}
}
</script>
|
以上代码关键在于对a标签的 v-for 指令的使用,items是data里面定义的对象。
v-for="(item, index) in items" 暴露了item和index两个接口,这是vue提供的,分别代表了items中每一项和该项的下表,接着就可以在标签中使用绑定
动态添加class:首先每一个tab都有默认的class,点击tab后,为当前tab添加active类,其他tab删除active类。
动态类名:
1
2
3
4
5
6
7
8
9
10
11
12
13
14
15
16
17
18
19
20
21
22
23
| //quiNav.vue
<template>
<div class="qui-nav nav-type-1">
<a v-for="(item,index) in items" :class="[commonClass,item.active ? activeClass : '']">
<span class="nav-txt">{{ item.text }}</span>
</a>
</div>
</template>
<script>
export default {
data: function() {
return {
commonClass: 'nav-item',
activeClass: 'active',
items: [
]
}
}
}
</script>
|
如何修改每一个item的active值?就是给每一个tab绑定一个点击事件,当点击事件触发时修改当前tab对应的item的active:
1
2
3
4
5
6
7
8
9
10
11
12
13
14
15
16
17
18
19
20
21
22
23
24
25
26
27
28
29
30
31
32
33
34
35
| <template>
<div class="qui-nav nav-type-1">
<a v-for="(item, index) in items" :class="[commonClass,item.active ? activeClass : '']" v-on:click="navClickEvent(items,index)">
<span class="nav-txt">{{item.text}}</span>
</a>
</div>
</template>
<script>
export default {
data: function() {
return {
commonClass: 'nav-item',
activeClass: 'active',
items: [{
text: '首页',
active: true
},
......
]
}
},
methods: {
navClickEvent: function(items, index) {
items.forEach(function(el) {
el.active = false;
});
items[index].active = true;
this.$emit('navClickEvent', items, index);
}
}
}
</script>
|
以上代码,利用 v-for 为每个a标签绑定了一个click事件,click事件为 navClickEvent ,事件接受两个参数。
点击的时候,把items中的每一个item.active设置为false,把当前tab的active设置为true,最后再出发一次自定义事件。
这样就完成了导航组件,使用了 v-for 循环输出每一个tab,为每一个tab绑定动态class类名,同时在点击事件的时候动态的切换类。
小节
回顾下我们这一篇章都学了什么内容。
- 页面路由的配置
- 按钮组件自定义属性props
- 按钮组件自定义事件 $on $emit
- 按钮组件自定义子块slot
- for循环实现导航组件
- 动态类名
quiList.vue组件
quiList.vue:
1
2
3
4
5
6
7
8
9
10
11
12
13
14
15
16
17
18
19
20
21
22
23
24
25
26
27
28
29
| //quiList.vue
<template>
<div class="qui-list">
<span class="list-tips">{{tipsText}}</span>
<qui-btn v-on:btnClickEvent="btnClickEvent" :msg=msg class="small"></qui-btn>
</div>
</template>
<script>
import quiButton from '../components/quiButton.vue'
export default {
props: {
msg: {
default: '下载'
},
tipsText: {
default: '默认的文案'
}
},
components: {
'qui-btn': quiButton
},
methods: {
btnClickEvent: function() {
alert('按钮点击事件')
}
}
}
</script>
|